Showing posts with label Dan Van Der Vieren. Show all posts

Sunday, February 14, 2016

Step-by-Step Directions on How to Solve the Rubik's Cube

Looking for an algorithm for how to solve the Rubik's Cube? It's here. However, it's not a "quick learn." But it's a gritty learn. You will need the tenacity to do it all, but you got this! If I can do it, I promise you, you can too. My suggestion: do it in parts, and practice that part over and over again until it becomes ingrained in you. Then move on to the next part.

These directions have been tested out by students...good luck! I hope they work well for you! And if you have any suggestions or struggles, please email me at lisa.winer@saintandrews.net and I will try to get back to you in a timely fashion!

I have blogged about how I used the Rubik's Cube in my problem-solving class here and created a mosaic here. I have gotten great help from http://www.youcandothecube.com/cube-mosaics/ and Dan Van der Vieren, and the video also displayed at the bottom of the page (not mine). My work is a combination of the video and Dan's help. This is NOT to help you solve the Rubik's cube super fast, but it is a way for you to solve it in anywhere around 3 minutes. Any suggestions are welcome. Here is a direct link to download the directions, but I also made it visual below, page by page. Any changes will be on the direct link, though, since the pictures are static. Do you have the grit it takes to solve it? If you made it this far, then of course you do! Good luck!

-------------------------------------------------------------------------------------------------------------------------How to solve the Rubik’s Cube!!
Top Layer
  1. Start with the yellow center and form a white cross around it
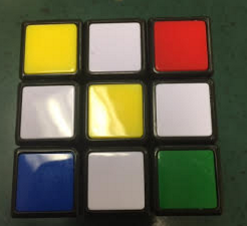
  1. Rotate so that middle of a side cube matches the color coming off of a white cube
  1. Rotate that face 180o so that the white part of the cross is now touching the white center.
  1. Repeat steps two and three until you have the white cross with a white center. Note that all of the sides have center cubes that match the white cross outer color.
  2. Play around to get the white corners in the right spot. The 4 white corners that you need to get in the right spot must be in the bottom row. You are in a good spot if the white cube is directly under the spot where you want it on the top layer (facing you.) Turn the bottom row twice in either direction to move the corner out of the way, turn the right side down, move the bottom twice in the opposite direction to get the white corner in place, and turn the right side up. If instead, the white corner was facing the right side and not you, turn the bottom once counterclockwise, turn the left side down, bring the bottom back clockwise, and turn the left side back up. Finally, if the white part of a corner cube is facing the bottom, you need to get it so that it is on the bottom row rather than the bottom itself. To do this, turn the left or right side down (where ever the corner misoriented), twist the bottom clockwise twice to move it out of the way, and then turn the left or right side (whichever you moved first) back up. Now the white face should be in the bottom row, and you can repeat the steps from the beginning of step 5.


Second Layer
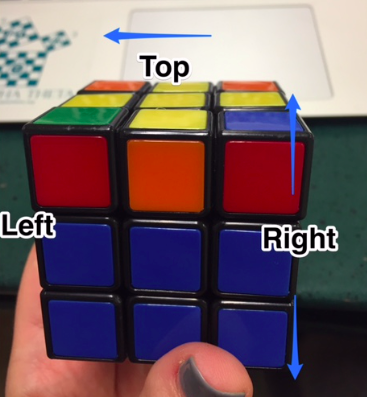
  1. Turn cube upside down and hold the cube so that you have a left side, a right side, and a top.
  1. Find a cube in the left or right face (top middle) that needs to be moved to the middle layer of the corner column. You may need to rotate the top so that the color lines up with the middle cube.
  1. In my case, I am moving the top middle cube to the right. So you will use this sequence: TRtrtlTL, where capital letters rotate clockwise and lowercase letters rotate counterclockwise.
  2. If instead, you want the top middle cube to move to the left, you use tlTLTRtr
  3. In some cases, you will not have a cube to move from the top, but will have to “pop out” one that is in the wrong place. Just repeat one of the sequences above to move a cube into the spot and then the one in the wrong spot will be out.
  4. Keep repeating this by turning the cube and ensuring all of the top middles are moved…you will know this is accomplished when the bottom two layers are complete or when all of the top middles have a yellow in them.


Keep the cube upside down.


You can memorize the sequence by noting that the 3rd and 4th moves undo the 1st and 2nd, and same for the 7th and 8th undoing the 5th and 6th.  Doing this over and over again will result in your brain “knowing what to do.”


Third Layer (4 stages)

Stage one: Getting the yellow cross on top. If you already have this, skip stage 1.

There are several possibilities that you can have. Do this move until you get the yellow cross, but be careful to hold it the correct way: LRTrtl


-a middle yellow and no other yellow touching it (hold any way)
-a yellow V, which you must hold the way I am (left side is to the left, right side is to the right)
-a row including the middle (it doesn’t matter if there are more yellows in the corner). You must hold it the way I am. (Same as above)
-a yellow cross, which is the ending position…it doesn’t matter if there are yellow corners or not.

Stage two: Houses
This is a house.
You can have a house in two ways…across from each other or adjacent. The goal is to get 4 houses, so if you already have 4 houses, skip stage 2.
-You must have one house on the right, like below. You can twist the top layer to ensure you find your two houses.
-From here on out, you will have the cube face you (not its corner). THIS IS A NEW WAY TO HOLD THE CUBE...we no longer talk about counterclockwise and clockwise. Hold it like this:


Stage three:

Goal: to get corners in the right spot (not necessarily the correct orientation). (Sometimes this step can be skipped if all corner cubes are in the correct place but not the correct orientation)

The picture below has a corner NOT in the right spot.


-To start, the top right corner has to have the correct cube; it can be incorrect or correct orientation. (IF YOU DON’T HAVE A CORRECT CUBE: If none are in the right place, proceed with the algorithm below, and then after the first time, one should be in the right place.)


Stage four:

All corner cubes are in the correct place but not the correct orientation. For example, the corner shown is in the correct place (corner of red and blue and yellow), but it is not oriented right. This stage will put all the corners in their proper location, just not necessarily oriented.

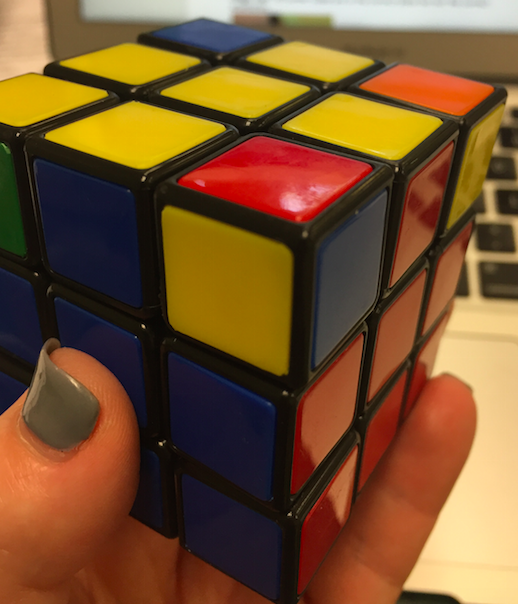
-Start with a cube that has an incorrect orientation and face that side toward you.
-The mantra is “Down, Left, Up, Right” meaning Right side down, bottom turn left, Right side up, bottom turn right. Do this until the cube on top is in place. Usually takes 4 times.
-The top corner should be in the correct place now and may look like this:
It’s OK that the white cubes are where they are! Just be sure to have finished the mantra (meaning, don’t forget to do the “over” after the corner cube is in place.)
-Now rotate the top over until a new corner cube is in the old corner place…this will likely be over a white color cube. Here is my new cube over the two white cubes from before.
-Repeat “Down, Right, Up, Over” two to four times, and the upper right corner should be in correct orientation now.

-Rotate the top over again until the new corner cube that is not the correct orientation is in the same right corner spot again, and repeat until you solved the cube!

------------------------------------------------------------------------------------------------------------------------

This is a video I used to solve the entire first layer...from there I had Dan help me with the rest!

Friday, December 4, 2015

Got time to do something outside the box? Ted-Ed is the answer!

I have posted about the Einstein problem before, but this time it just got real!
Dan Van der Vieren (Mr. VDV) is the teacher who recently Skyped with my class twice for an hour and a half each time just so we could learn how to solve the Rubik's Cube (by the way, 63% of us in the class can do it without looking at any video or notes--so far!) just created an awesome Ted-Ed video called "Can you solve 'Einstein's Riddle'?"

It is awesome. I have given this problem before, but this was a great little video that was very fun to watch. The characters, script, and editing make it all the more fun. I played it this morning for my students and paused at the exact moment so they could begin working. This is NOT a puzzle for the meek...but it certainly is a fun one. I don't know if it's true, but the internet boasts that only 2% of people can get the answer to this riddle.

Here's the version I have given:
But Dan's twist is that the fish is stolen...who took it?

Here's some of my students' work:

There's more, but I don't want to show you the answer. It will be fully explained, after the pause when students do work on the problem. It's a great activity, but I do recommend a full class period. If a student wants to give up, do it with them on the board...very fun!!

Great job, Dan!

I blogged about the bridge riddle here--we love Alex Gendler and the narrator! It's another great problem.

And my students enjoyed this variation on the Prisoners Hat Problem.
I hope these keep coming. They are fun and counterintuitive in many cases. They open my students' eyes to problems that I was exposed to at some point, but that they have never seen. I know your students will love them as much as mine did.


Sunday, November 22, 2015

Teaching (and Learning) Grit by Having Students Solve the Rubik's Cube

It all started when my 17-year-old son came home from his summer teen tour and had some much needed down time. The normal teenager would probably just sleep or watch videos, but AJ decided he wanted to solve the Rubik's Cube. I remember playing with one as a child and could get one face complete pretty easily. But in "those days," the directions were all on a folded piece of paper (the horror!), and I did not have the GRIT needed back then...at least not with this puzzle. But he watched a video over and over again, and by the next day, he had it down. (As I am writing this, I hear the clicks from him solving his cube...it's a good "brain break" for him between homework assignments.)

Over same summer, I was planning for my new Problem Solving Seminar, and I thought I would make solving the Rubik's cube an assignment for the class around Thanksgiving. I thought it would be a good time for kids to practice...and perhaps get encouragement from their families over break. I decided I would have them watch the video my son learned from, and I would facilitate, but that I did not have to really solve it...after all, it was an assignment for them, and maybe I didn't really have to (gulp) solve it?! It felt really daunting to me, and yet, I knew my kids could do it. I just didn't necessarily want to--which I know does not make a whole lot of sense right now...but it somehow did to me then.
I asked the bookstore to stock Rubik's cubes...the only thing they needed to purchase for the course, and after avoiding lots of "when are we going to solve the Rubik's cube?" questions, we finally watched the above video together last week. I broke down the first few steps as such:
  • The white cross on top with yellow in the middle
  • The white cross flipped to the bottom with white in the middle and a partial matching T
  • The entire white face with one full layer (top) complete
  • The entire second layer complete
As we were watching the video and pausing A LOT, I noticed that many of the students were having trouble visualizing. Ironically, one of the top students in the class could not follow the directions at all at first. But most kids were still very interested...solving the Rubik's Cube is like a fun party trick to pull out-out of nowhere, so most were determined. Some asked me to share the video via Classroom Google, so they could watch at their own pace, which I did.

Oddly, I was able to see how to do the first three of the four steps, above, pretty easily. I say oddly because my spatial reasoning is my weak point as a math teacher. You could spin me around in my own driveway, and I will get lost. But I guess having played around with the cube a lot as a kid, I could do these steps fairly quickly. So once I realized my kids needed help, and I could help them, I started to want to solve it myself. But it was not until then that I felt the need to solve it. They needed my help in explaining it, and that I could do. But I didn't know how far I could get...that second layer blew my mind.

Then luck happened. I got an email from the Mathematical Association of America (MAA) highlighting an article about Dan Van der Vieren (known to students as Mr. VDV), a teacher who wrote his undergrad thesis on the Rubik's cube. I immediately followed him on twitter and asked if he was willing to skype with my class...and he said yes! And then the magic happened.

Via skype, and with pictures like the one to the left, he showed us how to get the entire second layer complete. This involved an algorithm. My students struggled through this (as did I), making mistakes and having to redo it all over again, but once they finally got it on their own the texts with pictures started pouring in...on a Saturday night?! And it coincided with me getting that layer complete as well. We felt so accomplished!

Mr. VDV, is skyping with us again on Wednesday (the day before Thanksgiving break) to get us to the next stage. This, more than anything else that I have ever taught, is teaching the kids tenacity and grit and stick-to-it-tiveness. I do have a student who wants to give up. I hope more than anything else, I can encourage him to stick with it and solve it. He will learn more from that, I think than anything he has learned in my class. If he learns how to do it, which will come not only from my helping him but also from his willingness to learn from his mistakes, I will feel like I have done my job.

Mr. VDV has tweeted with me regularly, sharing pictures like these to help me help my students--so incredible. I am so thankful to him...funny this is the case right around Thanksgiving.
 
Lastly, Mr. VDV has told me that his class has made mosaics with Rubik's Cubes, and now, of course, we HAVE to do this...next semester. I can't wait. He told me to register at http://www.youcandothecube.com/, which I did, and someone got back to me Sunday morning! They will ship all the cubes to you for the mosaic making; all we have to do is pay for shipping back. 
I am looking forward to my post when we actually create this. Another challenge, Mr. VDV told me, is to make our school logo as a mosaic. There is an app for that! The possibilities are endless.

I am not there yet...I haven't solved the puzzle fully. I'm 2/3 done, but I can do the entire 2/3 from memory...by Thanksgiving break, I hope to have it fully done, along with the rest of the students in my class. I finally am learning about the grit I have been talking about to my class. And it feels great.