A blog by a veteran math teacher who tries to learn new things. Most posts are about teaching math and problem-solving, but sometimes, it's just about life.
I usually do this myself, asking for a volunteer to hold the string ends at the two foci while I draw the ellipse with a marker. Once I even (gasp) only showed a video depicting this. But now that we have block scheduling, the kids need to get up and move. Often. And so I gave the task to them in pairs to draw the perfect ellipse...and it came out beautifully.
Here is the task:
Student 1 is to draw two points on the board that are on an imaginary horizontal axis. I introduce these as "the foci."
Student 2 is to take the marker and pull the string taught. They are then to go all the way around and draw an oval, which is to be the perfect ellipse. See the video for the demonstration.
It was a bit like twister, which was really fun. But the beauty of it is that kids began to understand, without even talking about ellipses and their equations, why the major axis of an ellipse must contain its foci.
They get the definition of an ellipse, that the sum of the distances from the foci to any point on the ellipse, is a constant. And, that this distance is 2a*
Even better, some could not draw the ellipse because the points were too close together and their taught string would go off the board. So placement of foci was starting to have meaning.
But what was really cool was when students spoke about eccentricity without knowing what it was. The farther apart the two foci, the narrower the ellipse. The closer they were, the closer the shape was to a circle. (see last picture)
*This is a nice way to show how the string length = 2a...there is overlap from the foci to the left vertex. That part was missing on the right. You can also hold the string from one end to the other.
Demonstration of how the location of the foci affects the ellipse...discovered by students and untouched for picture.
I don't know if it made a difference with the students, but I think it did. I think they dug a little deeper. And that, I dig.
Looking for an algorithm for how to solve the Rubik's Cube? It's here. However, it's not a "quick learn." But it's a gritty learn. You will need the tenacity to do it all, but you got this! If I can do it, I promise you, you can too. My suggestion: do it in parts, and practice that part over and over again until it becomes ingrained in you. Then move on to the next part.
These directions have been tested out by students...good luck! I hope they work well for you! And if you have any suggestions or struggles, please email me at lisa.winer@saintandrews.net and I will try to get back to you in a timely fashion!
I have blogged about how I used the Rubik's Cube in my problem-solving class here and created a mosaic here. I have gotten great help from http://www.youcandothecube.com/cube-mosaics/ and Dan Van der Vieren, and the video also displayed at the bottom of the page (not mine). My work is a combination of the video and Dan's help. This is NOT to help you solve the Rubik's cube super fast, but it is a way for you to solve it in anywhere around 3 minutes. Any suggestions are welcome. Here is a direct link to download the directions, but I also made it visual below, page by page. Any changes will be on the direct link, though, since the pictures are static. Do you have the grit it takes to solve it? If you made it this far, then of course you do! Good luck!
-------------------------------------------------------------------------------------------------------------------------How to solve the Rubik’s Cube!!
Top Layer
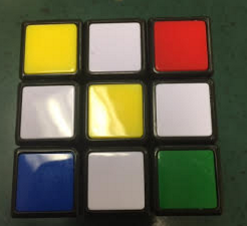
Start with the yellow center and form a white cross around it
Rotate so that middle of a side cube matches the color coming off of a white cube
Rotate that face 180o so that the white part of the cross is now touching the white center.
Repeat steps two and three until you have the white cross with a white center. Note that all of the sides have center cubes that match the white cross outer color.
Play around to get the white corners in the right spot. The 4 white corners that you need to get in the right spot must be in the bottom row. You are in a good spot if the white cube is directly under the spot where you want it on the top layer (facing you.) Turn the bottom row twice in either direction to move the corner out of the way, turn the right side down, move the bottom twice in the opposite direction to get the white corner in place, and turn the right side up. If instead, the white corner was facing the right side and not you, turn the bottom once counterclockwise, turn the left side down, bring the bottom back clockwise, and turn the left side back up. Finally, if the white part of a corner cube is facing the bottom, you need to get it so that it is on the bottom row rather than the bottom itself. To do this, turn the left or right side down (where ever the corner misoriented), twist the bottom clockwise twice to move it out of the way, and then turn the left or right side (whichever you moved first) back up. Now the white face should be in the bottom row, and you can repeat the steps from the beginning of step 5.
Second Layer
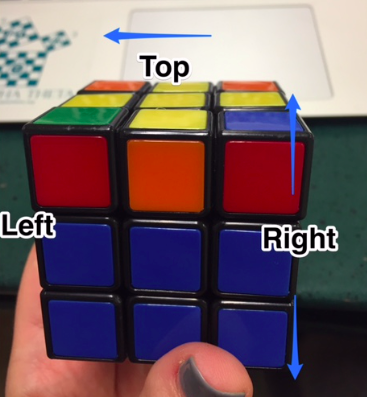
Turn cube upside down and hold the cube so that you have a left side, a right side, and a top.
Find a cube in the left or right face (top middle) that needs to be moved to the middle layer of the corner column. You may need to rotate the top so that the color lines up with the middle cube.
In my case, I am moving the top middle cube to the right. So you will use this sequence: TRtrtlTL, where capital letters rotate clockwise and lowercase letters rotate counterclockwise.
If instead, you want the top middle cube to move to the left, you use tlTLTRtr
In some cases, you will not have a cube to move from the top, but will have to “pop out” one that is in the wrong place. Just repeat one of the sequences above to move a cube into the spot and then the one in the wrong spot will be out.
Keep repeating this by turning the cube and ensuring all of the top middles are moved…you will know this is accomplished when the bottom two layers are complete or when all of the top middles have a yellow in them.
Keep the cube upside down.
You can memorize the sequence by noting that the 3rd and 4th moves undo the 1st and 2nd, and same for the 7th and 8th undoing the 5th and 6th. Doing this over and over again will result in your brain “knowing what to do.”
Third Layer (4 stages)
Stage one: Getting the yellow cross on top. If you already have this, skip stage 1.
There are several possibilities that you can have. Do this move until you get the yellow cross, but be careful to hold it the correct way: LRTrtl
-a middle yellow and no other yellow touching it (hold any way)
-a yellow V, which you must hold the way I am (left side is to the left, right side is to the right)
-a row including the middle (it doesn’t matter if there are more yellows in the corner). You must hold it the way I am. (Same as above)
-a yellow cross, which is the ending position…it doesn’t matter if there are yellow corners or not.
Stage two: Houses
This is a house.
You can have a house in two ways…across from each other or adjacent. The goal is to get 4 houses, so if you already have 4 houses, skip stage 2.
-You must have one house on the right, like below. You can twist the top layer to ensure you find your two houses.
-From here on out, you will have the cube face you (not its corner). THIS IS A NEW WAY TO HOLD THE CUBE...we no longer talk about counterclockwise and clockwise. Hold it like this:
Stage three:
Goal: to get corners in the right spot (not necessarily the correct orientation). (Sometimes this step can be skipped if all corner cubes are in the correct place but not the correct orientation)
The picture below has a corner NOT in the right spot.
-To start, the top right corner has to have the correct cube; it can be incorrect or correct orientation. (IF YOU DON’T HAVE A CORRECT CUBE: If none are in the right place, proceed with the algorithm below, and then after the first time, one should be in the right place.)
Stage four:
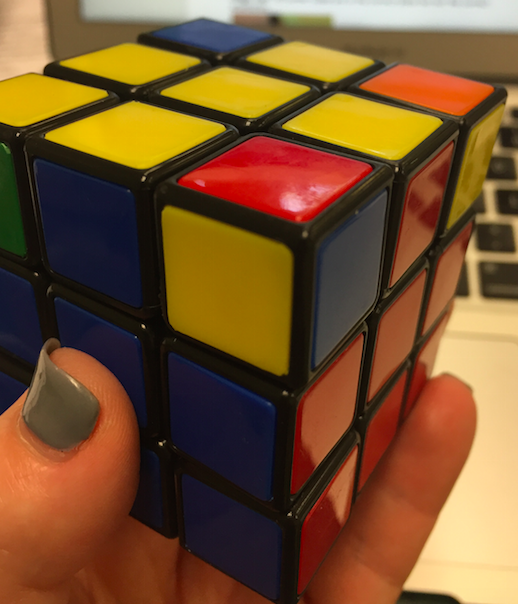
All corner cubes are in the correct place but not the correct orientation. For example, the corner shown is in the correct place (corner of red and blue and yellow), but it is not oriented right. This stage will put all the corners in their proper location, just not necessarily oriented.
-Start with a cube that has an incorrect orientation and face that side toward you.
-The mantra is “Down, Left, Up, Right” meaning Right side down, bottom turn left, Right side up, bottom turn right. Do this until the cube on top is in place. Usually takes 4 times.
-The top corner should be in the correct place now and may look like this:
It’s OK that the white cubes are where they are! Just be sure to have finished the mantra (meaning, don’t forget to do the “over” after the corner cube is in place.)
-Now rotate the top over until a new corner cube is in the old corner place…this will likely be over a white color cube. Here is my new cube over the two white cubes from before.
-Repeat “Down, Right, Up, Over” two to four times, and the upper right corner should be in correct orientation now.
-Rotate the top over again until the new corner cube that is not the correct orientation is in the same right corner spot again, and repeat until you solved the cube!
Today my Problem Solving Class unpacked the 225 Rubik's Cubes shipped from http://www.youcandothecube.com/cube-mosaics/ and began the task of creating our school crest. Last week, a student used Photoshop to turn a picture of the crest into a mosaic, and after spending time adjusting some of the squares that did not turn out quite right, we were ready! I asked Diane from the company for a bit of help, and she immediately responded and helped me to figure out what to do. My class and I divided the mosaic into 25 sets of 9 cubes. Each student (9 altogether) were assigned 2 or 3 sets of the 9 cubes, and their task was to make the top face look like the one portion of the 9 cubes...so for example, if you remember the opening of the Brady Bunch, one student had to first figure out the face of "Marcia", then "Carol", and this continued till they did the whole group of 9...then they placed them on the butcher paper I had on the floor.
Here is how we divided up students, and we looked at the original just to make sure we fet good about the colors.
It was pretty amazing to get 225 Rubik's cubes all solved...it was quite satisfying see them all! But we had to mess them up to get them to match the picture.
We had no idea how long it would take. Our class is 1.5 hours long, and I definitely thought we would need at least two classes to complete our task. But about an hour in, I new we could do it...it started getting really exciting as we had only a handful of cubes left. We finished with about 10 minutes to spare!
We may do one more, depending if we can find a piece of student artwork that works well with the mosaic program. Next year, we will use 400 cubes to get an even more accurate design.
I think this project really promoted teamwork, collaboration, and grit. We talked about it for months, so finally doing it was very fulfilling for students.
I am working on writing up directions to solve the cube--it will not be directions to make you the fastest, but rather to make you remember how to solve it and show other students...I am collaborating with the teacher who skyped with me and taught my class and me how to solve a Rubik's Cube, Dan VDV. He was so patient and helpful, and I hope to do the same for the #MTBoS! I have written about how solving the cube helps to develop grit here.
As part of the MTBoS Blogging initiative, today I will capture my "Day in the Life of a Math Teacher."
I am a week late, but I was the lead chaperone on an Immersion Trip to Canada with 22 students and three other chaperones last week. It was truly the trip of a lifetime, not just because the kids were fantastic, but because the chaperones were too. We went dog sledding, tobogganing, tubing, and visited an Ice Hotel, a Canadiens game, and so so much more...so, onto my Day in the Life.
5:45 - Wake up to Allison by Elvis Costello. My husband reminds me that I need to make the alarm lower. I agree as it wakes us up to the core. I forget to try to change it every evening, and so it's "Groundhog's Day" all over again tomorrow.
5:45 - 6:00 Shower
6:00 - 6:30 My favorite part of the morning...read The Skimm, catch up on emails, texts, and go through Facebook, Instagram, Twitter, and Blog feeds. I had 130 Blogs waiting in my inbox when I got back from Canada!
6:30 - 7:00 Get dressed and ready for work
7:00 - 7:10 Make breakfast and take things out to the car
7:10 - 7:50 Drive to school. I've been making this drive for 20.5 years, 12.5 of which have been with my son. He has been coming to school with me since Kindergarten, and now he is finishing up his senior year at SA!
7:50 - 8:05 Go to the faculty lounge to make Via Starbucks coffee...the coffee in the lounge is just too weak for me! Say hello to several colleagues. Punny Guy and I contemplate rhombi at the copy machine (true story). Colleague A and I talk about Mu Alpha Theta (Math Club) announcements.
8:05 - 8:30
-write this up
-email with Student A about upcoming MAO competition
-Student B pops in with a question
-email Department Chair about organizing AMC competition and a middle school student needing a peer tutor
Keep in mind that this is my easy day. I only have one hour and a half class...this is why I have time at all to blog. Yesterday, I taught or worked in the Math Lab from 8:30 - 3:30 with only two ten minute breaks, and 30-minute lunch. Then from 3:30 - 4:00 there was a math competition. But today is easy in comparison!
8:30 - 10:00 Honors Problem Solving Seminar
We were not in school last week, so I need to pick back up from where I left off. Half the students are new this semester, so I have to do some differentiated teaching. My plan is that one-half will learn how to do the Rubik's Cube (see my blog here), and the other half will work on math competition problems today. Yesterday after school, I worked on a draft of how to solve the Rubik's Cube, which I will allow my one-half to try out today. I also asked Dan Van Der Vieren to collaborate. I will also assign Problem Set 9 for them to work on for a week outside of class. We are getting ready to build our mosaic of our school crest! I am so excited and am thankful for http://www.youcandothecube.com/cube-mosaics/ for providing 225 free Rubik's cubes! We have a lot of work ahead of us, but this is the idea, below:
OK, so #MTBoS changes everything, as I wrote about here. I gave this warm-up to my Problem Solving class from http://thinkzone.wlonk.com/MathFun/Triangle.htm. My plan was just to make it a warm-up...students have been working on it for an entire hour! We emailed for a hint...it's a tough one, but my students love the challenge.
My student called this an "asymptote problem," because you get "really close to the answer, but you never get it."
Hoping to hear from the person who posted the problem soon. Also, taught one student how to get to level 2 of the Rubik's Cube and taught a new student how to get the white cross. Very fun class!
10:00 - 10:15 Pick up Work Wife and Fun Bobby and walk to Chapel. Gave Work Wife the geometry problem in hopes she will help us. Talk about shoes that are suitable for the "cold front" we have here in Florida, and how to handle a situation that came up in class.
10:15 - 10:45 Chapel
We sang Amazing Grace, said the Pledge of Allegiance, and listened to opening prayers...this one was interesting, and became part of the homily: "And why worry about a speck in your friend's eye when you have a log in your own?" Our reverend went on to talk about reflection and introspection before judging. He showed the video above and talked about how we all need some harmony in our lives rather than judge others. We had a birth this week in the community and a death. Life.
10:45 - 10:50 Walk back to classroom with Punny Guy. Of course, a pun was told along the way. Wish I could remember it now!
10:50 - 11:20 Debrief with Sheila from Explorica about our trip to Canada. Briefly talk about possibilities for next year.
11:20 - 11:35 Walk to Math Lab and sing happy birthday to Colleague A with math department.
11:35 - 12:05 Work on quiz, print materials for class tomorrow, answer emails, look over possible Immersion Trip for next year that Sheila already sent me!
12:05 - 12:35 lunch--caught up with Bestie. Haven't seen her in a while!
12:35 - 12:40 Deans office for peanut m&m's, Head of Upper School's office for lotion for my chapped hands!
12:40 - 2:45 Worked on getting Mosaic ready for Friday's class, emailed art teacher, answered emails; Graded most of the grading from when I was away last week
2:45 - 2:55 On hold with Sur La Table--to see if we can have a cooking class reunion for our immersion trip.
2:55 - 3:30 helped students with math, sent messages on classroom google to student groups about looking for a peer tutor and also for Algebra 2 honors class to google change of base theorem because I forgot it was in their homework; collected MAO check from student
3:30 - 3:45 chatted with Work Wife about new geo book possibilities and weekend plans. Find it unbelievable that she looked at new book (Jacobs) today, and it has the same impossible geometry problem in it!
3:45 - 4:10 got butcher paper from an art teacher, talked to her about getting her to enter one of her pictures into the mosaic contest. Found a peer tutor for Middle School student! Working on getting a second one.
4:10 - 4:20 entered Florida Math League scores
4:20 - 4:45 Delivered Trig Formula Sheet and Florida Math League papers to colleagues mailboxes and chatted with My Vault about blessings and curses and children and colleges and Jewish Forum
4:45 - 5:10 talked with Sur La Table representative--pricey...texted student to see what he thinks...checked on another cooking school.
I am glad that I am in the habit of doing all of my lesson planning on the weekends because so much of my easy day is spent doing other things! Though, truly, I contemplate having more free time on the weekends...
5:10 - 6:10 change and work out--tried Piyo DVD...hard!
6:10 - 7:00 drive home, ask kid about his day, watch him catch up on his sleep
7:00 - 8:00 enjoy this dinner hubby made, clean up
8:00 - 9:00 catch up on emails and texts, clean, get ready for tomorrow...4 peer tutors available for middle school! Entered workout into #FITBoS sheet. Tweet out help on the geo problem. Sur La Table is No. Pack stuff up for tomorrow, including Exploding Kittens.
9:00 -? Chill with hubby, watch TV, catch up on Words with Friends and Pinterest, and then we do it all again. Will I remember to change the volume of my alarm? Probably not :(
A Pi Day Challenge for Advisories...they have a week to work on it and it is due on Pi Day...here is an example from 2013...some favorites were teacher or student doppelgangers and movies that involved math. (Note: I deleted any students or faculty members from the one I am sharing) I used math club (MAO) member names throughout for fun. It can be used in a problem solving or a regular class as well, but it's got a mix of levels.
Here are some formula sheets that I have taken from the web over the years and put together for my personal use. I am not sure who each part is originally from. I googled today, but I don't see an originator. If you know, please let me know and I will update this blog.
This year, I color coded it a bit, but here is one that is not color coded and can be changed as necessary for your class.
I hand this out to students for a quick reference so they can see everything at once, but they are not allowed to use it on tests and quizzes.
My Honors Problem Solving Seminar is an elective that is new for me and my school this year, and although I definitely brought many topics to the course, I must admit that my plans often get thrown out the window thanks to the MTBoS. One blog post or one tweet that I read before school could completely change my plan for class that day. There are so many things that I wanted to teach in my regular math classes, but never had the time. Now I can share with interested students all of the cool topics that are not part of the traditional curriculum. So I say, everyone, let's all teach a flexible #MTBoS course to our kids! Now is the time to get your elective out there to be approved by your department chairs or administration. My students all double up with this course and another math class. The prerequisite is Pre-Calculus or any honors math course.
Below is a list of many of the topics I covered first semester.
Things that I brought to the class (i.e., used before #MTBoS) but have mostly blogged about so are now out there: